

Grand Cherokee [“ZJ”] Project
Click on boxes below to view different phases of the build.


Components needed:
1/2" thick, square metal tubing. approx. 15'
1/4" thick, square metal tubing, approx 15'
misc. small, thin metal strips and components
Spare tire mounting hardware (optional)
High-lift jack (optional)
black spray paint
Welder (required)
Grinder/cutting wheel (required)
Acetylene torch (optional)
Drill, misc. sockets/wrenches, pliers, tape measure, safety glasses
4-6 hours of time, some fabrication /welding skill, and patience.
Process:
STEP 1 - Measure your roof and sketch plan for your custom roof rack: Unlike a pre-fabricated rack, you get to decide exactly how big you want your rack to be. For our ZJ, we wanted a medium sized rack that is very low profile. See our schematic on the right to see our measurements. You want the rack to be about 1/2" wide then the existing vertical roof rails that run down the roof. Also, we utilized one of the two horizontal roof rails to mount lights -- we left space for that on the front of the rack near the windshield. Your design will likely be different in which case more material and time will be needed.
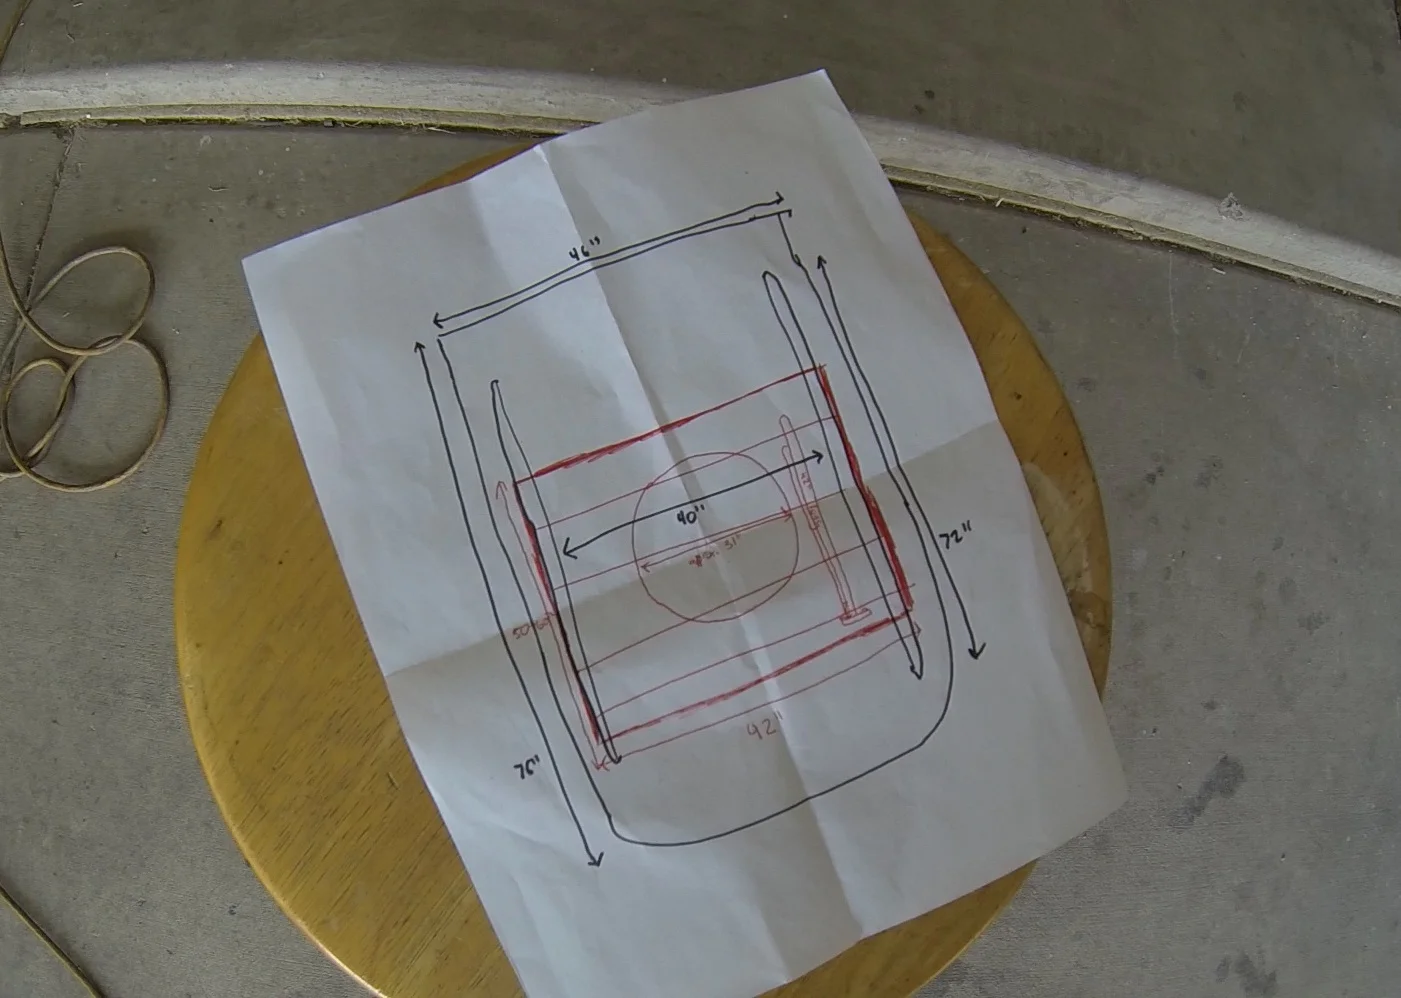
STEP 2 - Purchase materials and begin cutting everything to your measurements: Begin by making the outer perimeter of your rack. Use 1/2" thick metal for this part to add extra strength. In our case, the length of the rails were about 50" and the width was about 42", so you'll need at least 15' of metal to be safe.

STEP 3 - Begin welding: Lay everything out and clamp or hold it down. Weld each end of the metal tubing. You don't need a great welder or a ton of skill, but make sure each side of the metal gets welded. Use a grinder wheel to smooth out the welds after you are done.
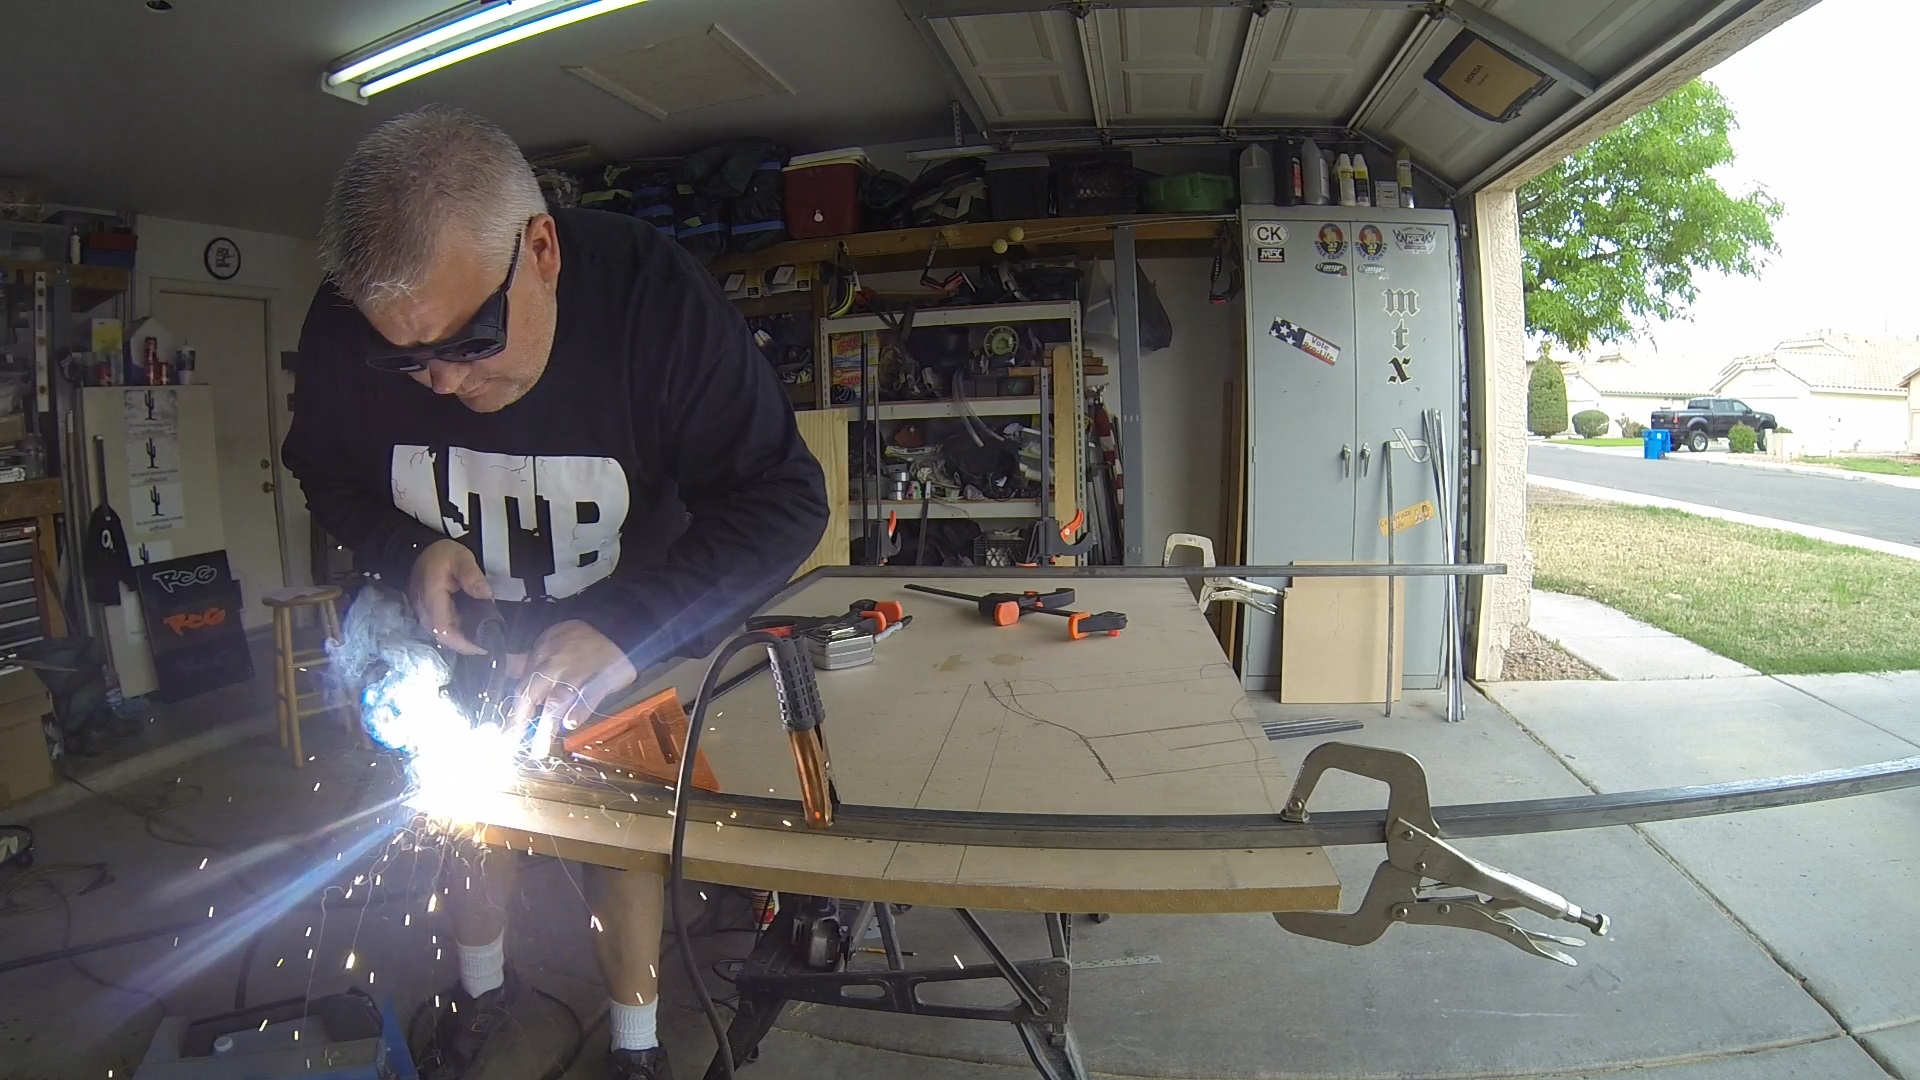
STEP 4 - Cut and weld inner support pieces: After getting the outside frame done, begin to cut the thinner 1/4" metal to be used for the inner supports. You'll need to measure, but the width should be the same as the 1/2" metal tubes on the front and rear of the rack. We used 4 horizontal tubes distributed equally across the length of the rack. The two middle supports will be used as part of the tire carrier if desired. Use remaining metal tubing for vertical supports between the 2nd and 3rd horizontal supports. This will add strength to hold the tire. Weld in place, again, making sure they are welded securely and sanded down. You will also want to use four small pieces of the 1/2" thick metal at each corner underneath the main frame to elevate the rack to accommodate for the slightly curved roof (see pics below).

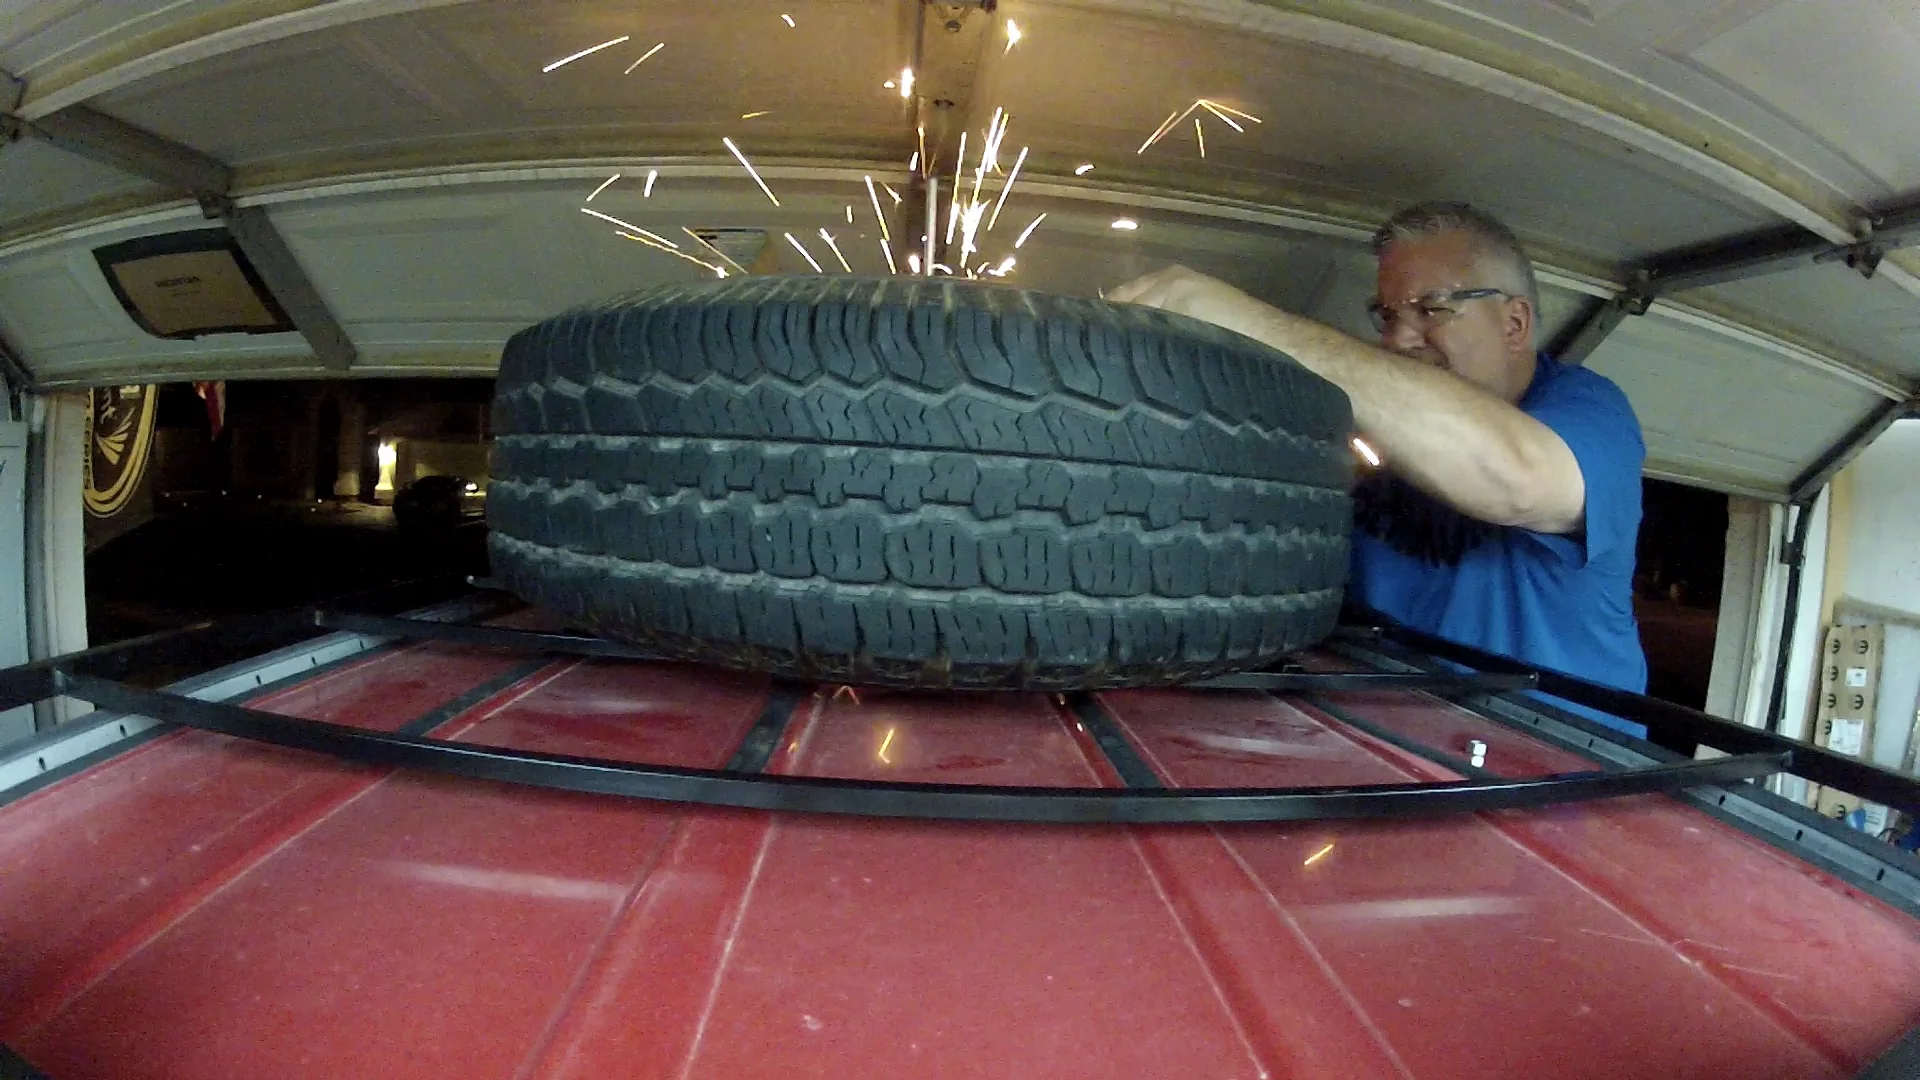
STEP 5 - Add spare tire mount: You will need to be creative here. We wanted to use the existing spare tire hardware to hold the tire on to the rack (a curved hook that goes through the tire, then uses a half-moon shape piece and fastener to tighten down the tire). You will need to make your own hook here, but you can purchase the nut and adapter from a dealership. This is where the acetylene torch comes in. Take a thick threaded piece of metal and use heat, gloves, and pliers to bend the end at least 90 degrees. Allow to cool and later cut to the proper height once the tire is mounted. On the roof rack, you will need to have a small hole to receive the hook. We found a small piece of metal that had worked perfectly (see right). You may need to purchase a small mount or make one of your own. Make sure it is welded securely to the supports on the rack. It's difficult to explain, see pictures to the right.
STEP 6 - Paint the rack: Now that all of the basic components of the rack are completed, give it a solid couple coats of paint. You want something somewhat high-quality as this will help protect the rack from rust and the elements.

STEP 7 - Remove existing roof rails: Before placing the rack on, you'll need to remove one or both factory roof rails. I say one, because we actually ended up using one at the very front to mount all of our lights. If you choose to remove both, you can make your rack longer and cover the full length of the roof. To remove them, use a socket wrench to remove the caps at each end of the long, length-wise rails. Hold in the tabs on each end of the horizontal rails and slide back to remove them.
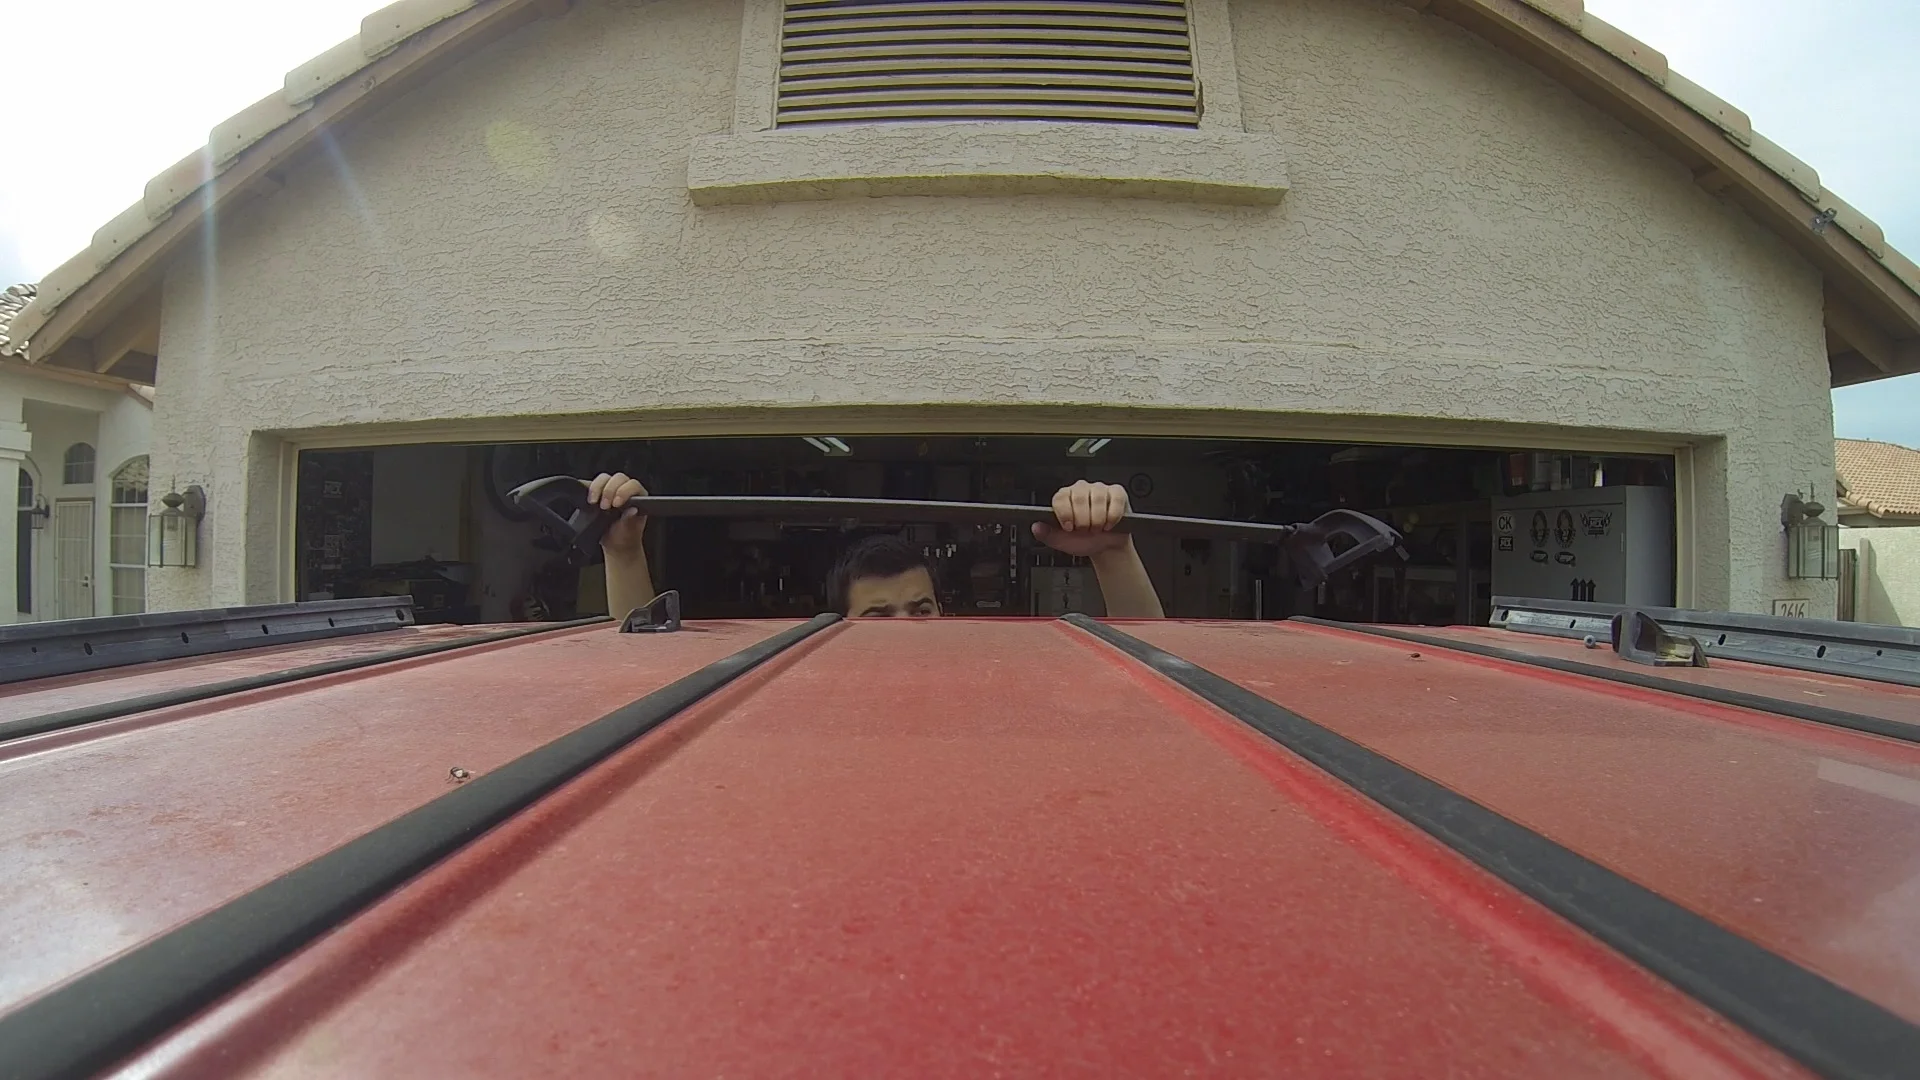
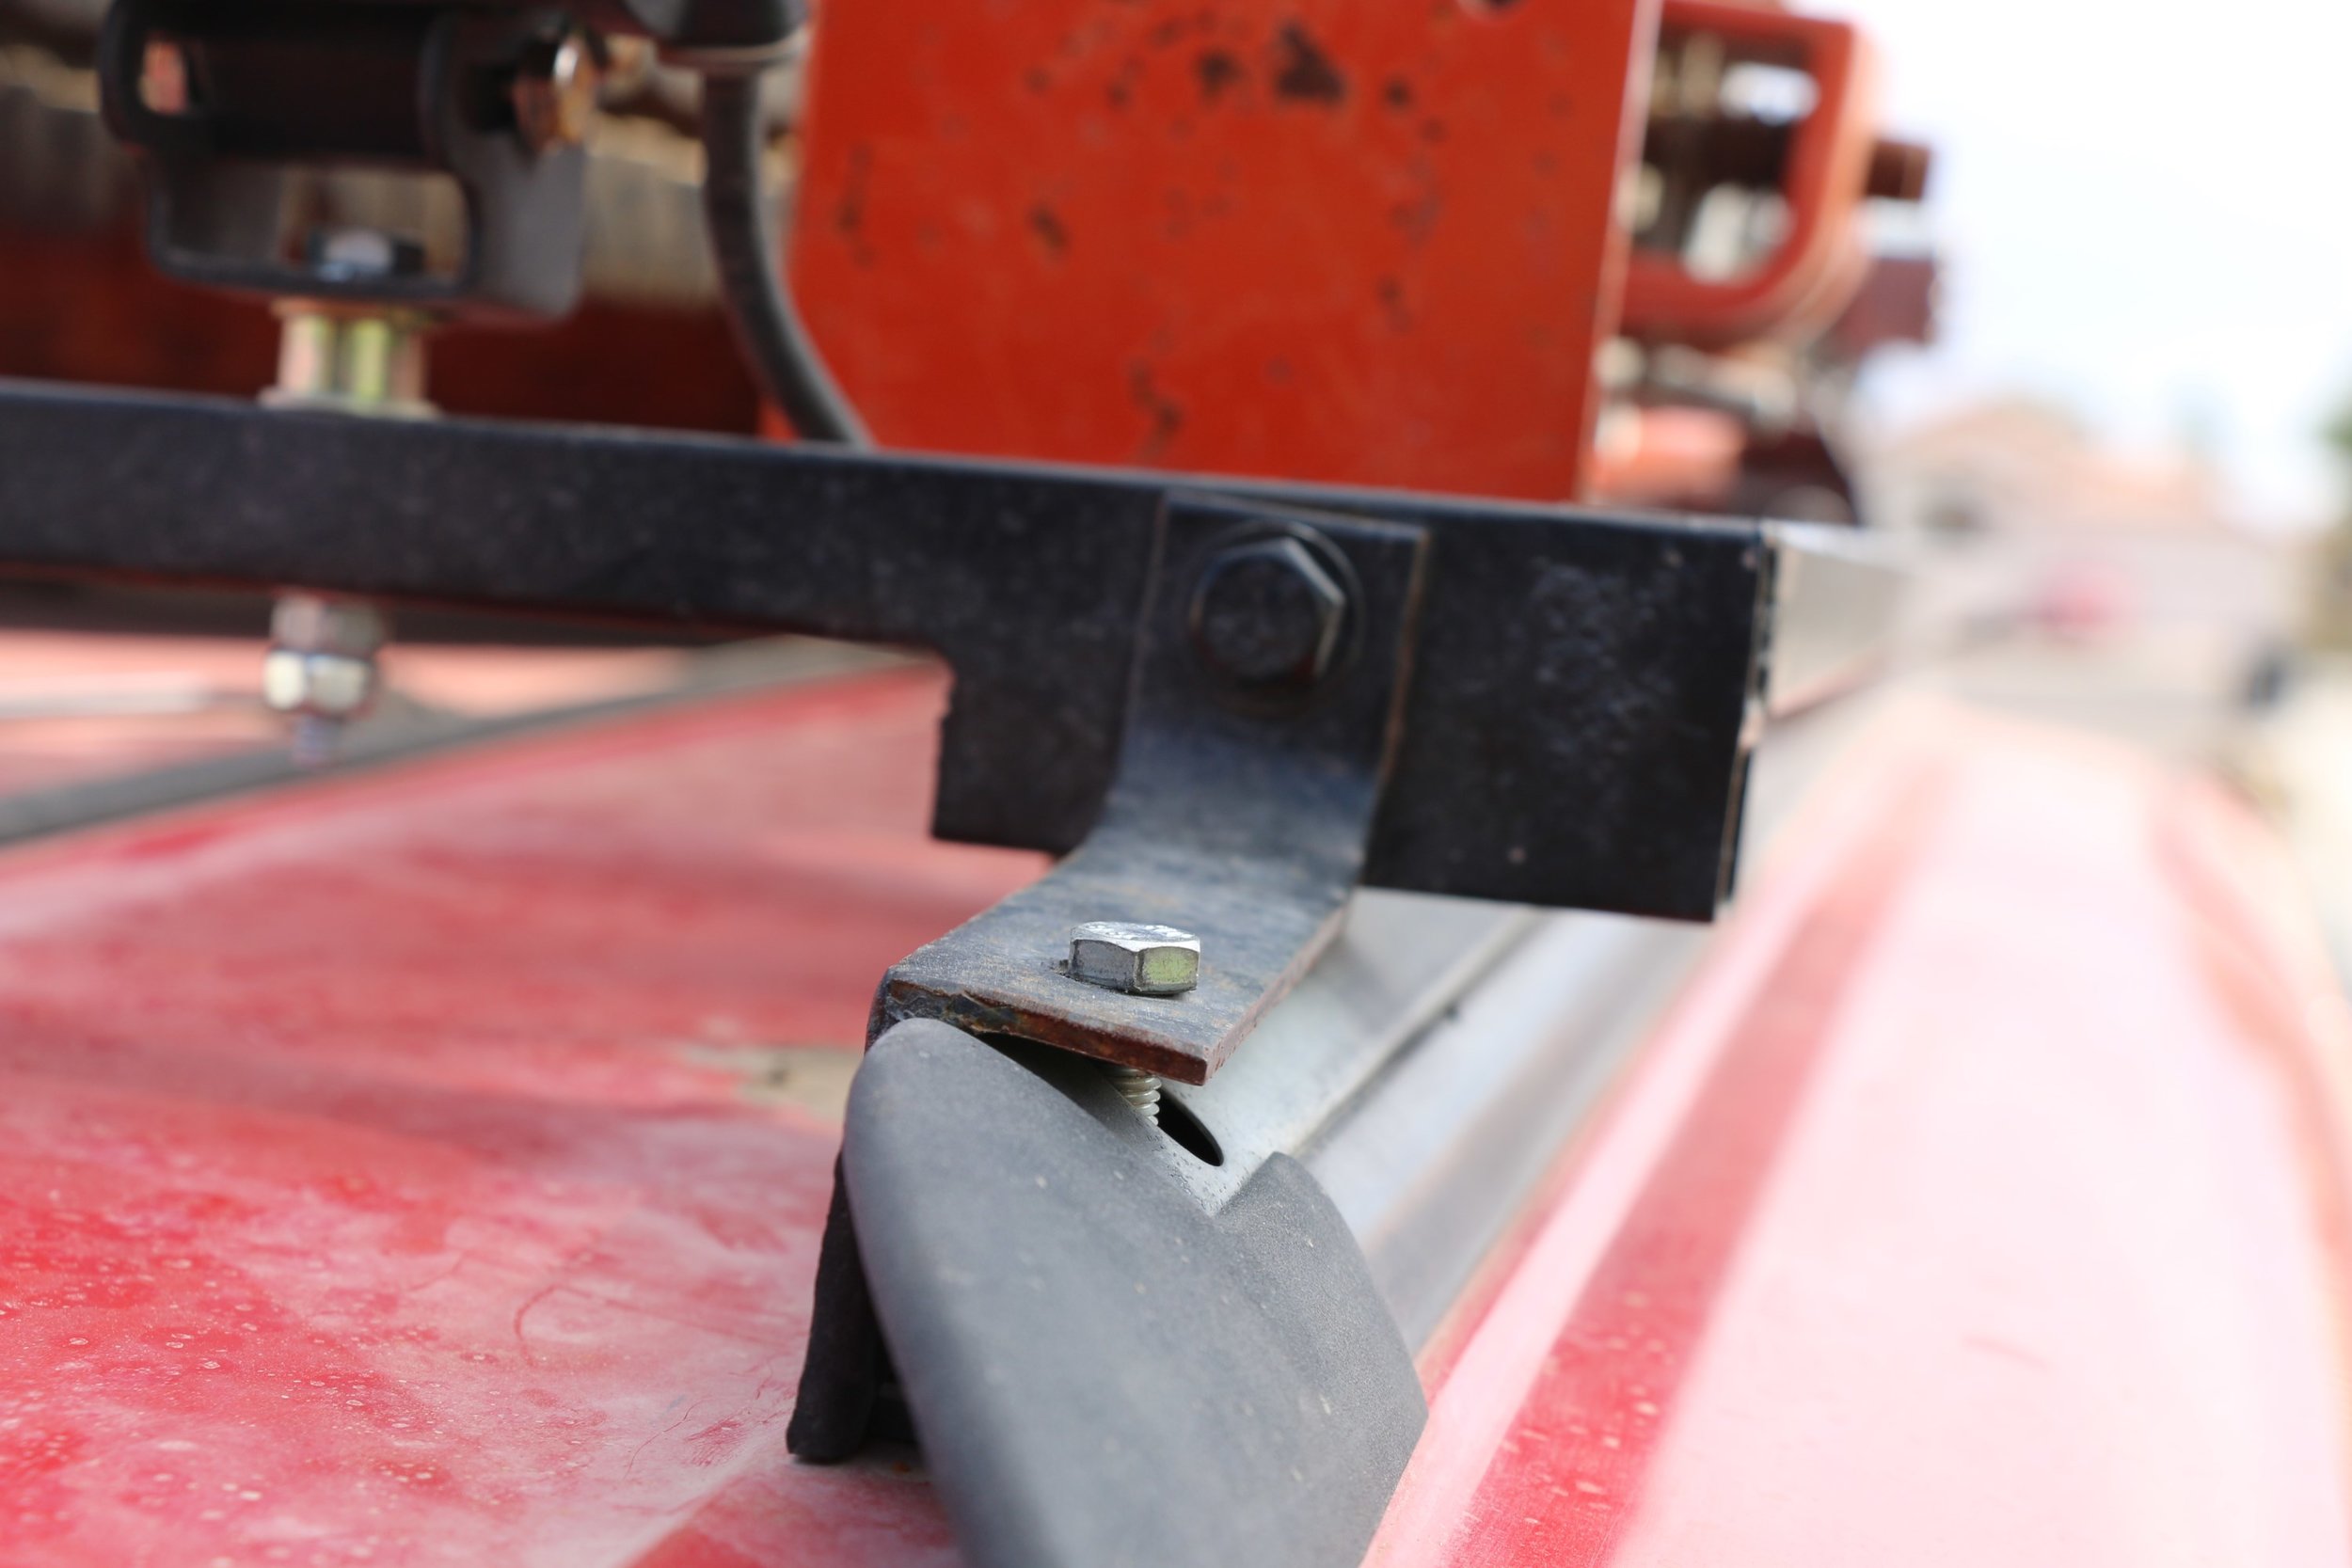
STEP 8 - Custom fab mounts to hold rack on roof: Again, you'll need to get creative here. See pics at right for close ups. Basically you need to make an L-shaped bracket that is welded to the rack, then sits flush against the inside of the existing roof rails to prevent the rack from sliding sideways. You'll need to bend thin metal strips and weld them together to make the brackets. Grind them down to smooth and drill holes for mounting hardware. These brackets, which are welded to the roof will then bolt directly into one of the bolt holes for the rack. You will need to remove the bolt (15mm) and replace with a longer bolt. There will be one on each corner attaching your mount firmly to the roof. We've had no issues with this setup for over 2 years now.


STEP 9 - Mount rack to the roof: Using the custom mounts created in step 8 that are bolted/welded to the rack, place your rack on the roof. Line up with the proper holes in the roof rails and bolt down the rack to the roof. There should be 4 or more bolts attaching the rack. Check all welds to confirm integrity of the rack. Place tire in the center and use your existing hook and nut to hold it down solid. Cut any excess portion of the hook away if you didn't already do that in step #5.

STEP 10 - Add any desired accessory mounts: This step is optional and will depend on what you want to mount to the roof besides the spare tire. To mount the hi-lift jack, we created two identical curved pieces of metal using the torch, and affixed them to the right side of the rack using a series of metal strips and bolts. Create a piece like shown on the right, paint it, and secure to the roof. You may need to add foam strips to prevent the jack from clanking around on the trail (it's annoying). Drill holes sideways through at least one of the holders for a lock or other pin to secure the jack in place. You can also create dedicated custom mounts for a shovel, CB radio antenna, or gas cans depending on your needs.
